Lighthouse CI
Sep 14, 2023 Max Lee
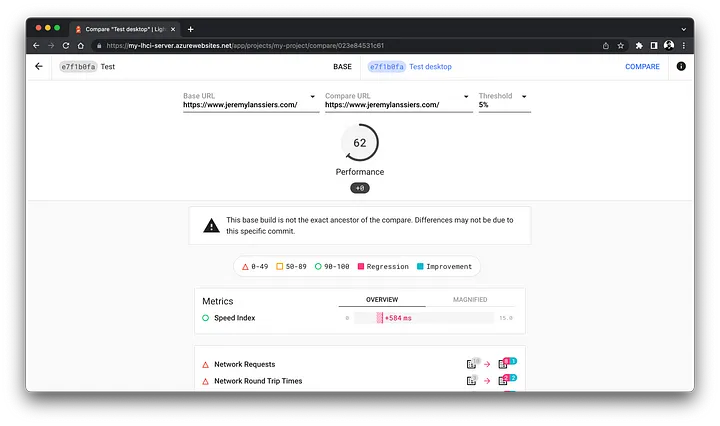
繼之前的 FCP、FID、LCP 指標優化分享,這次要分享自動化跑分工具,它可以在每次部署時都執行跑分並將跑分紀錄下來,甚至可以起一個 server 來視覺化每次跑分的趨勢。
CLI Command
$ npm install -g lhci
$ lhci autorun
$ npm install --save-dev lhci
$ npm run <your script>
Configuration
// lighthouserc.js

module.exports = {
  ci: {
    // 跑分環境設定
    collect: {
      // 要跑哪些頁面
      url: ["http://localhost/"],

      // 你的網站所有資源的根目錄
      staticDistDir: "./dist",

      // 每次跑分要執行幾次
      numberOfRuns: 2,

      // 傳入 lighthouse 的參數
      // https://github.com/GoogleChrome/lighthouse/#cli-options
      settings: {
        preset: "desktop"
      }
    },
    // 斷言設定,跑分過低可以警告或報錯
    assert: {
      assertions: {
        // 1. 單項監測
        "first-contentful-paint": "off",
        "installable-manifest": ["warn", {"minScore": 1}],
        "uses-responsive-images": ["error", {"maxLength": 0}]

        // 2. 類別監測
        "categories:performance": ["warn", { minScore: 0.8 }],
        "categories:accessibility": ["error", { minScore: 0.5 }]
      }
    },
    upload: {
      // 跑分報告展示/儲存的設定
      // 1. 報告會被上傳到 google-lighthouse 的 server 上
      // 會限時的被 host 在一個公開 domain 上
      target: "temporary-public-storage",

      // 2. 使用自己的 lighthouse server,會有一些管理權限,可視化圖表
      target: "lhci",
      serverBaseUrl: "http://localhost:9001/",
      token: "XXXXXXXXXXXXXXXXXXXXXXXXXXXXXXX",

      // 設定這個可以在發PR時有 github status check
      githubToken: "",
      githubAppToken: "",
    }
  }
};
https://github.com/GoogleChrome/lighthouse-ci/blob/main/docs/configuration.md
使用 Lighthouse Server Locally
⚠️ 必須安裝 chrome
1. 建立 Server
方案一、使用 Docker Image
$ docker volume create lhci-data
$ docker container run --publish 9001:9001 --mount='source=lhci-data,target=/data' --detach patrickhulce/lhci-server
方案二、自己寫 Node server
$ npm install @lhci/server mysql2
// app.js

import { createServer } from "@lhci/server";

console.log("Starting server...");
createServer({
  port: "9001",
  storage: {
    storageMethod: "sql",
    sqlDialect: "mysql",
    sqlConnectionUrl: "mysql://root:Ww4455662+@localhost:3306/lhci_sql",
  },
}).then(({ port }) => console.log("LHCI listening on port", port));
$ node app.js
2. 要跑分的專案與 server 進行 token 設定
$ curl https://your-lhci-server.example.com/version # Make sure you can connect to your server.
0.x.x

$ lhci wizard
? Which wizard do you want to run? new-project
? What is the URL of your LHCI server? https://your-lhci-server.example.com/
? What would you like to name the project? My Favorite Project
? Where is the project's code hosted? https://github.com/GoogleChrome/lighthouse-ci

Created project My Favorite Project (XXXXXXXX-XXXX-XXXX-XXXX-XXXXXXXXXXXX)!
Use build token XXXXXXXX-XXXX-XXXX-XXXX-XXXXXXXXXXXX to connect.
Use admin token XXXXXXXXXXXXXXXXXXXXXXXXXXXXXXXX to manage the project.
// lighthouserc.js

module.exports = {
  // ......
  upload: {
    target: "lhci",
    serverBaseUrl: "http://localhost:9001/",
    token: "XXXXXXXXXXXXXXXXXXXXXXXXXXXXXXX",
  }
};
3. 開始跑分
$ npm run build
$ lhci autorun
4. Lighthouse Server

加入 CI CD 流程
# Github Action
安裝 github app 並提供 repo 權限
https://github.com/apps/lighthouse-ci
# .github/workflows/ci.yml

name: CI
on: [push]
jobs:
  lighthouseci:
    runs-on: ubuntu-latest
    steps:
      - uses: actions/checkout@v3
      - uses: actions/setup-node@v3
        with:
          node-version: 16
      - run: npm install && npm install -g @lhci/[email protected]
      - run: npm run build
      - run: lhci autorun
💡 可以將 Lighthouse Server 架在 AWS / GCP 等雲服務上
